General Warm-up5 min
row or bike
5 min steady · zone2 conversational
Easy pace.
Mobility Primer8 min
Shoulder CARs

External video — Shoulder CARs by Functional Bodybuilding.
How to do it
- Setup
- Standing tall, one arm out to your side at shoulder height, the rest of your body still.
- Execution
- Take at least 8-10 seconds to complete one full circle — count it the first time to calibrate your own pace. Hit two checkpoints every circle: at the top, your arm brushes past your ear; at the bottom, it reaches down and slightly behind your hip. Complete the full circle through both checkpoints, then reverse direction and repeat.
- Common error
- Turning it into a brisk, loose arm-circle warm-up — if a full circle takes less than 8 seconds, or you can't feel real tension at the ear checkpoint and the behind-the-hip checkpoint specifically, it has become a warm-up swing, not this drill.
- Feel
- Steady, controlled tension everywhere in the circle, including at both checkpoints — never a swung, momentum-driven arc. Any pinch, especially in the left shoulder, means shrink the circle until it's gone, even if that means missing a checkpoint.
2 sets, 5 reps each direction, each arm.
2 × 5/side · rest 0:10
Prescribed: 5/side · rest 0:10
Prescribed: 5/side · rest 0:10
Wall Slides

External video — How to Improve Posture with the Wall Slide by DR MATT FONTAINE.
How to do it
- Setup
- Stand with your entire back, both forearms and the backs of both hands flat against a wall, elbows and shoulders bent to roughly 90°, low back gently flattened (not arched) against the wall.
- Execution
- Slowly slide both arms up the wall as far as you can while every point of contact stays flat on the wall the whole time, then slide back down to the start. That is one rep — slow and controlled both directions.
- Common error
- Letting the low back arch or the forearms peel off the wall partway up — that fakes range that is not real scapular/shoulder control. Stop at the true point everything stays flat and build range over weeks, rather than pushing the arms forward off the wall to gain height.
- Feel
- Mild, controlled tension through the shoulder blades and upper back as they rotate and glide. This is control work, not a stretch — go slow. Any pinch, especially deep in the shoulder, means you've gone above the height where everything stays flat — slide back down until it's gone.
Back flat against the wall, arms slide up maintaining contact — 2 sets of 10.
2 × 18s hold · rest 0:15
Prescribed: 18s hold · rest 0:15
Prescribed: 18s hold · rest 0:15
Band Dislocates

External video — Band Shoulder Dislocates by Theory of Motion Exercise Library.
How to do it
- Setup
- Grip a resistance band or broomstick with a wide overhand grip. Start wider than feels necessary — you can always narrow it on a later session, but starting too narrow is this drill's most common failure.
- Execution
- Keeping the elbows locked straight and the core braced, raise the band up and over your head, continuing the same arc down behind your back until your arms are behind you, then reverse. Use the first rep to calibrate your grip: if you complete the full arc with the low back staying flat and the shoulders staying down, not hiked toward the ears, your grip is wide enough — keep it there for the set. If the low back arches or the shoulders round forward to complete the arc, stop, walk your hands out further apart, and restart the rep.
- Common error
- Gripping too narrow and forcing the arc through anyway — this pushes the range into the lower back and shoulders instead of the shoulder joint's true rotation. Widen the grip before repeating the rep, never force it through.
- Feel
- A stretch across the chest and front shoulders as the band passes overhead, shoulder blades drawing together as it passes behind you, low back flat throughout. Any pinch, or the low back lifting off flat, means your grip is too narrow — widen it before your next rep, not after.
2 sets of 15.
2 × 18s hold · rest 0:15
Prescribed: 18s hold · rest 0:15
Prescribed: 18s hold · rest 0:15
External-Rotation Pre-Activation (light DB/band)
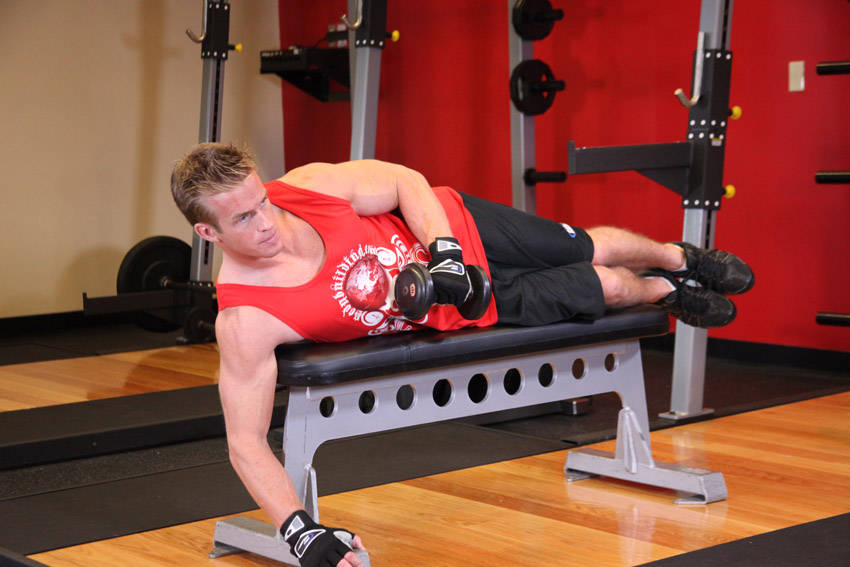
Light DB or band, mild effort only — this is prehab, not training. Stop well short of fatigue, never push through pain.
2 × 12/side @ RPE 3-4 · rest 0:30
Prescribed: 12/side @ RPE 3-4 · rest 0:30
Prescribed: 12/side @ RPE 3-4 · rest 0:30
Shoulder PAILs/RAILs (90/90 external-rotation end-range)
External video — Shoulder Flexion PAIL's/RAIL's by Dr. Beau Beard.
How to do it
- Setup
- Stand or sit tall. Upper arm pinned to your side, elbow bent to 90°, light dumbbell or band in that hand. Rotate the forearm outward, away from your stomach, to your true end-range of external rotation — as far as it goes without the elbow leaving your side.
- Execution
- PAIL: from that end-range, gently drive the forearm further into rotation against the resistance, ramping the effort up over 5-10s, hold the peak, release slowly over 5s. RAIL: immediately try to resist the arm being rotated back toward your stomach, holding 5-10s without letting the elbow leave your side. That's one rep. Repeat, then switch arms.
- Common error
- Turning it into continuous reps instead of the ramp-hold-release protocol, or letting the elbow drift away from your side to fake more rotation — both defeat the isometric loading this drill exists for.
- Feel
- Building effort at your end-range during the PAIL, genuine resisting strength during the RAIL — this should feel like real, if mild, work, not a passive stretch. Keep it at mild effort only; this is prehab before pressing, never push it toward pain.
60-70% effort, 3 reps/side.
3 reps/side · ramp 20s, hold 8s · effort RPE 6-7 · rest 0:30-1:00
Prescribed: 3 reps/side · ramp 20s, hold 8s · effort RPE 6-7 · rest 0:30-1:00
Main Lift — Bench Press + Overhead Press20 min
Bench Press
Only 3 days landed this week — this is your one pressing slot for chest.
4 × 5-8 @ RPE 7 · tempo 2-2-X-0 · rest 2:00
Prescribed: 5-8 @ RPE 7 · tempo 2-2-X-0 · rest 2:00
Prescribed: 5-8 @ RPE 7 · tempo 2-2-X-0 · rest 2:00
Prescribed: 5-8 @ RPE 7 · tempo 2-2-X-0 · rest 2:00
Prescribed: 5-8 @ RPE 7 · tempo 2-2-X-0 · rest 2:00
If pain flares
- Sharp pain, or mechanics visibly breaking down (arms drifting forward, elbows flaring): first widen the grip 1-2 cm and re-set the scapulae — your own discovered fix; if that doesn't resolve it, reduce ROM (partial/board-limited bottom); if still worse, swap Bench Press for Incline DB Press (or a floor press) this session and flag it (§D.8).
Overhead Press
Your one pressing slot for shoulders this week. Left shoulder: dull stretch/ache is fine, sharp pain or mechanics breaking down means stop and regress the set.
4 × 5-8 @ RPE 7 · tempo 2-2-X-0 · rest 2:00
Prescribed: 5-8 @ RPE 7 · tempo 2-2-X-0 · rest 2:00
Prescribed: 5-8 @ RPE 7 · tempo 2-2-X-0 · rest 2:00
Prescribed: 5-8 @ RPE 7 · tempo 2-2-X-0 · rest 2:00
Prescribed: 5-8 @ RPE 7 · tempo 2-2-X-0 · rest 2:00
Face Pulls + Arm Superset10 min
Face Pulls

Non-negotiable even in the most compressed week.
2 × 12-15 @ RPE 7 · rest 1:00
Prescribed: 12-15 @ RPE 7 · rest 1:00
Prescribed: 12-15 @ RPE 7 · rest 1:00
Curl + Triceps SupersetRope Hammer Curl + Triceps Rope Pushdown
Rope Hammer Curl
Elbows pinned to the sides.
Triceps Rope Pushdown
Full extension.
Rounds
Rope Hammer Curl
Prescribed: 12 @ RPE 7-8 · rest 0:30
Triceps Rope Pushdown
Prescribed: 12-17 @ RPE 7-8 · tempo 2-0-2-0 · rest 1:00-1:30
Rope Hammer Curl
Prescribed: 12 @ RPE 7-8 · rest 0:30
Triceps Rope Pushdown
Prescribed: 12-17 @ RPE 7-8 · tempo 2-0-2-0 · rest 1:00-1:30
Mobility Finisher (light)6 min
Wall Pec Stretch

External video — Pectoralis (Chest) Stretch by EmergeOrtho-Triangle Region.
How to do it
- Setup
- Stand side-on to a wall or doorway. Forearm flat against it, elbow bent roughly 90°, upper arm raised to that week's height — 90° (arm level with the shoulder) or 120° (arm angled up above shoulder height).
- Execution
- Keeping the forearm fixed on the wall, rotate your torso away from the wall until you feel the chest stretch. Hold for the prescribed time. Repeat at the second angle if the session calls for both.
- Common error
- Hiking the shoulder up toward the ear to fake more stretch — keep the shoulder blade pulled down and get the range from turning the torso, not from lifting the shoulder.
- Feel
- A steady stretch across the chest and front shoulder. Any sharp pinch inside the joint means back off the height or how far you rotate. The left shoulder sharpening at all is your signal to stop that side.
45s each side.
45s/side hold · rest 0:15
Prescribed: 45s/side hold · rest 0:15
Cross-Body Shoulder Stretch

30s each side.
30s/side hold · rest 0:15
Prescribed: 30s/side hold · rest 0:15