Conditioning · Rebuild+

Week 5 · TueTarget 55 min
3 exercises · 3 sets ahead

Eat something 2-3 hours before this session — training under-fuelled costs you real strength on every lift. If you didn't and energy is under 5/10 today, cap this session at RPE 6 regardless of the week.

Warm-up3 min

row

3 min steady · zone2 conversational

Easy.

Zone 2 Base + Norwegian 4×442 min

row or bike

20 min steady · 60–70% HRmax

Zone 2 base, folded into the intervals below.

row or bike — Norwegian 4x4

4 × 240 s on / 180 s off · 90–95% HRmax

1x/week baseline this week. 3 min active recovery at 60-70% HRmax between intervals.

Cool-down + Mobility Flow10 min
Couch Stretch

Passive hold, 60s each side.
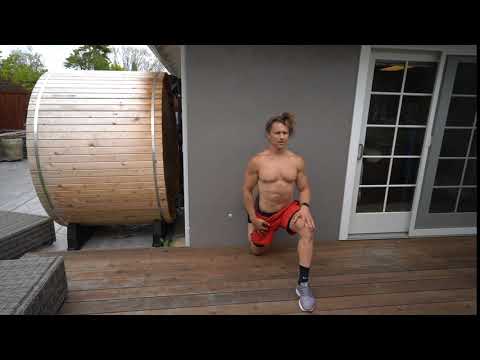
Video thumbnail: Couch Stretch

External video — Couch Stretch by Functional Bodybuilding.

How to do it
Setup
Kneeling lunge, rear shin up against a wall or couch/bench behind you, rear foot pointing up. Front foot flat on the floor, well out in front. Torso tall, ribs stacked over the pelvis.
Execution
Squeeze the rear glute to sink the hip forward and deepen the stretch. Hold completely still for the full prescribed time. This is a finisher drill only — never do it before lifting.
Common error
Arching the lower back to bring the torso closer to vertical instead of actually moving the hip forward — this fakes depth without touching the hip flexor. Keep the ribs pulled down and let the glute squeeze do the work.
Feel
A steady, building stretch through the front of the rear hip and thigh that should ease slightly the longer you hold it. Dull ache is normal. A sharp pinch in the hip means come out of the position, don't fight it.

60 s/side hold · rest 0:15

Wall Pec Stretch

45s each side.

Video thumbnail: Pectoralis (Chest) Stretch

External video — Pectoralis (Chest) Stretch by EmergeOrtho-Triangle Region.

How to do it
Setup
Stand side-on to a wall or doorway. Forearm flat against it, elbow bent roughly 90°, upper arm raised to that week's height — 90° (arm level with the shoulder) or 120° (arm angled up above shoulder height).
Execution
Keeping the forearm fixed on the wall, rotate your torso away from the wall until you feel the chest stretch. Hold for the prescribed time. Repeat at the second angle if the session calls for both.
Common error
Hiking the shoulder up toward the ear to fake more stretch — keep the shoulder blade pulled down and get the range from turning the torso, not from lifting the shoulder.
Feel
A steady stretch across the chest and front shoulder. Any sharp pinch inside the joint means back off the height or how far you rotate. Either shoulder sharpening at all is your signal to stop that side.

45 s/side hold · rest 0:15

Dead Hang

40s, full relax through the shoulders and lats.

Video thumbnail: Dead Hang

External video — Dead Hang by OPEX Fitness.

How to do it
Setup
Both hands on a pull-up bar, roughly shoulder-width, full overhand grip. Step or jump off the floor so your entire bodyweight hangs.
Execution
Consciously release any bracing, then check yourself against two signs of a true passive hang: your shoulders should ride up noticeably closer to your ears than when you're standing, and your ribcage should feel like it's lengthening away from your hips. If your shoulder blades are still pulled down and your neck looks the same as standing, you're still actively hanging — let it go and check the two signs again. Hang and breathe for the full prescribed time.
Common error
Actively pulling the shoulder blades down ('active hang') without noticing you're doing it — this is the default position most lifters hold from habit. The two-sign check in execution is how you catch it.
Feel
A gentle traction pulling through the shoulders and lats, grip working the forearms, shoulders visibly higher than your standing posture. Any pinching in the shoulder means come down and shorten the next hold.

40 s hold · rest 0:15

RPE — lifting sets

Rate of Perceived Exertion — reps in reserve (RIR) is how many more reps you had left.

10
RIR 0
Maximal effort.
Never programmed as a target in this plan.
9
RIR 1
One more rep was there, barely.
8
RIR 2
Two clean reps left in the tank.
7
RIR 3
Three left — working hard, not grinding.
6
RIR 4
Solid work, far from failure.
≤5
RIR 5+
Warm-up / ramp effort.

Tap outside to close

Effort — mobility & primer sets

Effort against your own end range — RIR ("reps in reserve") doesn't apply to a hold or an isometric, so this scale describes how hard the contraction felt instead.

8
Hard end-range contraction — right at the edge, just barely maintained for the prescribed hold.
The peak-week PAILs/RAILs target — held, never exceeded.
6–7
Strong contraction, real effort, comfortably sustained for the hold.
4–5
Moderate — a working ramp, noticeable but not straining.
2–3
Light ramp — could hold this all day.

Tap outside to close

Tempo

What to do: pick a weight that lets you hit the prescribed reps at the prescribed RPE while moving at this tempo, then log what actually happened. That's the whole job — everything below is only for when you want to know why.

Reading the four numbers

3-1-1-0
Eccentric (lowering) · pause at the bottom · concentric (lifting) · pause at the top — each number is seconds. This example, this programme’s Week 1 back squat, is 3s down, 1s paused in the hole, 1s up, no pause at the top.
3-3-X-0
"X" in place of a number means move that phase explosively — as fast as you genuinely can, not on a count. This example, Week 6’s back squat, is 3s down, 3s paused at the bottom, drive up as hard and fast as possible, no pause at the top.

Why this programme prescribes it

It standardises the stimulus. A rep's difficulty depends on how fast it's performed, not only the weight and rep count — the same weight moved faster is an easier rep. Writing the tempo down is what makes “RPE 7” mean the same thing this week and next; without it, RPE stops being comparable week to week.

This is a measurement/programming argument, not a muscle-growth claim on its own.

It removes momentum. A controlled lowering phase and a real pause at the bottom take away the free elastic rebound a rushed rep gets from the muscle and tendon stretching and snapping back (the "stretch-shortening cycle"). Without that assist, the muscle has to start the lift from a dead stop — why a paused rep feels harder at the same weight, and why it’s obvious immediately if a rep gets bounced instead of controlled.

Evidence: solid, well-established muscle physiology (Komi PV, "Stretch-shortening cycle: a powerful model to study normal and fatigued muscle." J Biomech 33(10):1197–1206, 2000) — a mechanical fact, not a hypertrophy-specific finding.

Tendon and connective tissue load differently under a controlled tempo. Tendons adapt to how they're mechanically loaded, and a slower, controlled rep holds real tension in the tissue for longer per rep than a bounced one — relevant here because this programme leans corrective (the shoulder/hip work).

Evidence: real but broader than this exact prescription. Bohm S, Mersmann F, Arampatzis A, "Human tendon adaptation in response to mechanical loading: a systematic review and meta-analysis of exercise intervention studies on healthy adults." Sports Med Open 1:7, 2015 (27 studies, 264 participants) found loading INTENSITY was the strongest driver of tendon stiffness gains, with duration a smaller factor — applying that general principle to this programme's tempo choice is this programme's own reasoning, not a trial that tested this exact tempo.

What it does NOT do: make a set better for muscle growth by itself. A slower or paused tempo is not shown to build more muscle than a rep performed under your own, honestly controlled pace.

Evidence: the best current evidence points the other way. Schoenfeld BJ, Ogborn DI, Krieger JW, "Effect of repetition duration during resistance training on muscle hypertrophy: a systematic review and meta-analysis." Sports Medicine 45(4):577–585, 2015 found similar hypertrophy across repetition durations from 0.5 to 8 seconds each — and very slow reps (over roughly 10s) came out WORSE, not better.

Tap outside to close

About this set